ngOnChanges Example Step-by-Step


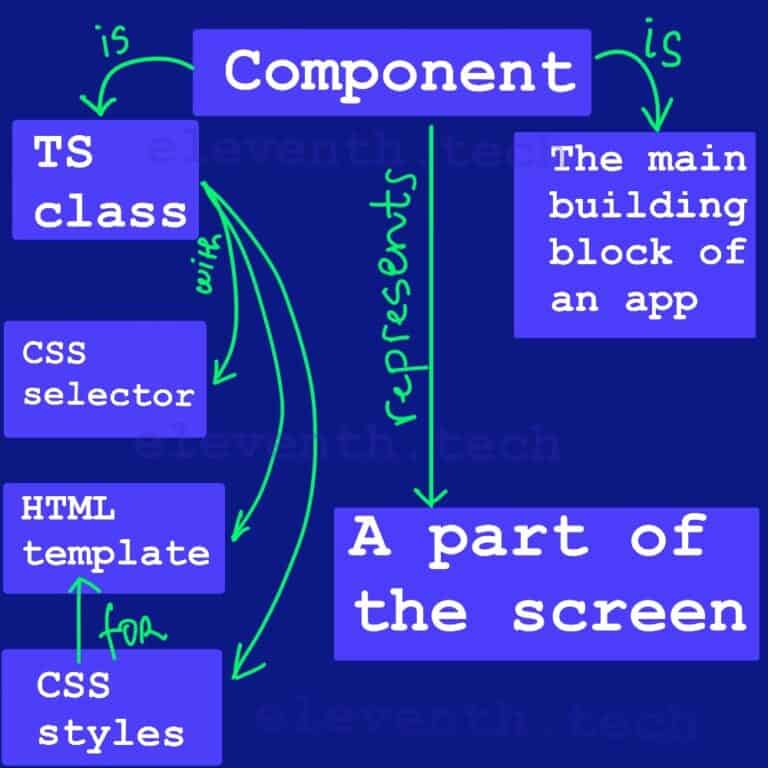
ngOnChanges is a method in a component’s class (or directive) executed whenever a change occurs in an @Input property of the class.
In this ngOnChanges example, we’ll learn how to use the ngOnchanges lifecycle hook in Angular. We’ll create a simple chores list app using only two components – a parent (App Component) and a child. The first one will contain a select element providing a menu of options (all chores) and a button. So when we select one option and click the button, the component will send the selected data to the child component. The child will collect the data in an array, so we can print it on the screen.
When the App Component passes the data, Angular detects the change in the child’s input field. We can ‘catch’ that change by using the ngOnChanges method. Angular calls it when an alternation occurs in an input property of a component. It’s important to know that Angular will call only once ngOnChanges if the sent value is a reference type (array, object, etc). You can create a copy of that field and reassign it to the property so the reference in the stack will change and Angular will detect it and call the method.
1. Create an ‘OnChanges’ app
Create an app using the Angular CLI command – ng new onchanges-app. We won’t need Router, so type ‘N’
When you run the command in the console, Angular will create the root App Component so we can use it as a parent component. Replace the generated HTML from the template with the following code:
<!-- app.component.html -->
<h1>I am the App Component</h1>
<h3>Select completed chore</h3>
In the app.component.ts, create an array of strings that will represent all chores. We will add some dummy data. Each element of the array will be an option in the select element in the App Component’s Template. So the user can choose from the list a specific chore as completed. Add a new field ‘completedChore’ that we will use later to save the selected chore.
import { Component } from '@angular/core';

@Component({
  selector: 'app-root',
  templateUrl: './app.component.html',
  styleUrls: ['./app.component.css'],
})
export class AppComponent {
//Dummy data. Each value represents a particular chore
// the user can choose from the list
  choresList = [
    'Washing dishes',
    'Making the bed',
    'Vaccuming',
    'Dusting',
    'Cleaning the bathroom',
    'Laundry',
    'Watering plants',
    'Grocery Shopping',
    'Cleaning out the oven',
    'Cleaning the windows',
  ];

// here we will save the selected chore from the select element
  completedChore = '';
}
2. Create a new component
Let’s add a new component. Type ‘ng generate component chores-list’ into the console and make sure you are in the app’s directory.
The command will produce four files related to our component. In the chores-list.component.ts file, we can find the component selector (app-chores-list). We will use it in the parent template (when Angular locates the selector, it will render the corresponding component).
Add an input property(chore) of type string in the class – it will receive the data from the App Component. Define an array ‘comletedChores’ – we will add in it the value of the input property when it has been changed. Implement the OnChanges interface from Angular and define the ngOnChanges method in the class.
import {
  Component,
  Input,
  OnChanges
} from '@angular/core';

@Component({
  selector: 'app-chores-list',
  templateUrl: './chores-list.component.html',
  styleUrls: ['./chores-list.component.css'],
})
export class ChoresListComponent implements OnChanges {
  // this property will receive the data from the App Component
  // we will listen for changes in the field through the ngOnChanges method
  @Input() chore = '';

  // In this array, we will save every change from the input property
  // hence, we will collect each value received from the App Component
  completedChores: string[] = [];
  // we define the ngOnChanges method, we'll use it later to detect a change in the input field
  ngOnChanges() {
  }
}
Let’s add some HTML to the chores-list template to test the component.
<h2>Completed Chores List</h2>3. Load the chores-list component on the screen
In order to load the chores-list component on the browser screen, we have to put its selector in the parent component (App Component Template).
<h1>I am the App Component</h1>
<h3>Select completed chore</h3>

<!-- this is the chores-list selector. The chores-list component will load here -->
<app-chores-list></app-chores-list>
It’s time to test what we have done. Run ng serve in the console to start the app and type http://localhost:4200/ into the address bar of your browser. If you see the same thing as the picture below – congrats! The blue rectangle is the App Component and the purple one is the chores-list component. The next step is to show all chores in a select element in the app.component.html file.

4. Load the choresList array in an HTML select element
We want to load all elements from the choresList property of AppComponent class in an HTML select element. We will use *ngFor in app.component.html to loop through the array, so each element of it will be a specific option of the select.
<h1>I am the App Component</h1>

<h3>Select completed chore</h3>

<select>
<!--  We use *ngFor to loop through the choresList array.
      Each option will show in the select element
      We create a local variable to store a current element from the element and we print it within an option
-->
  <option *ngFor="let chore of choresList">{{chore}}</option>
</select>
<button type="button">Add to parent</button>
5. Listen to the click event and handle it through a method in the class
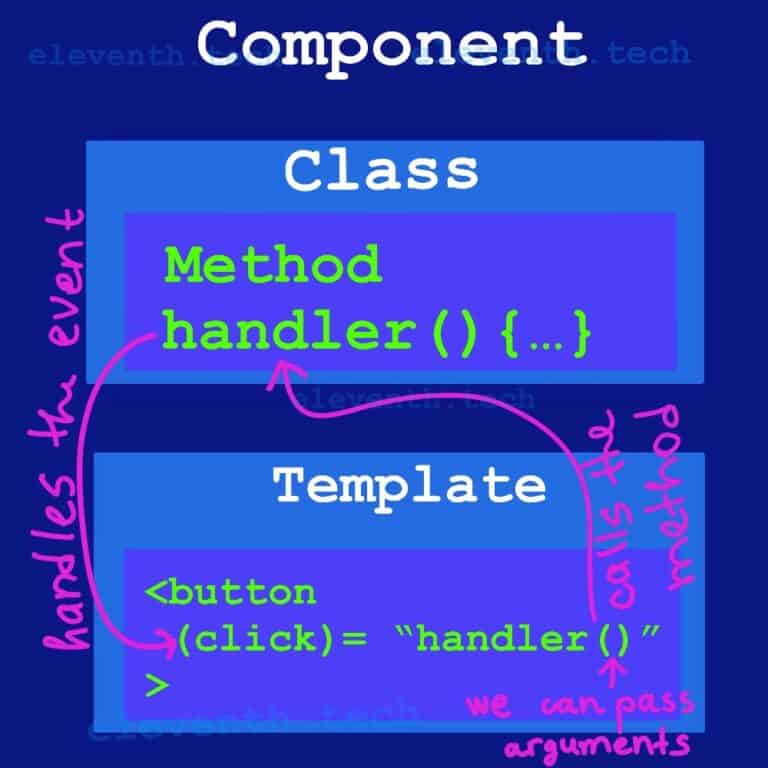
We will create a button element in the template so that when the user selects a completed chore and clicks the button, we will pass the data in the class using event binding.
We have to implement a method ‘addCompletedChore()‘ in app.component.ts that we will append to the click event in the button element. If it occurs, the method will be called and we can pass the value of the select element to it. We’ll access the value using a template variable that gives us a reference to the DOM element (<select></select>).
<h1>I am the App Component</h1>

<h3>Select completed chore</h3>

<!-- In order to get the selected value, we have to create a template variable '#chores'.
     It's a reference to the select element and we can access the value of the option
 -->
<select #chores>
  <option *ngFor="let chore of choresList">{{chore}}</option>
</select>

<!-- We listen to the click event and if it occurs, the method from the class
     'addCompletedChore(chores.value)' will be called with an argument of selected option(chores.value))
   -->
<button type="button" (click)="addCompletedChore(chores.value)">Add to parent</button>
<app-chores-list></app-chores-list>
Let’s handle the event in app.component.ts. Earlier we created the completedChore property and we can save now the option’s value in it.
import { Component } from '@angular/core';

@Component({
  selector: 'app-root',
  templateUrl: './app.component.html',
  styleUrls: ['./app.component.css'],
})
export class AppComponent {
  choresList = [
    'Washing dishes',
    'Making the bed',
    'Vaccuming',
    'Dusting',
    'Cleaning the bathroom',
    'Laundry',
    'Watering plants',
    'Grocery Shopping',
    'Cleaning out the oven',
    'Cleaning the windows',
  ];

  // we store the changes in this field
  completedChore = '';

  // It handles the click event and receives the option's value as an argument
  addCompletedChore(value: string) {

    // here we save the value from the select element
    // and each time the button has been clicked, this value will change
    this.completedChore = value;
    console.log(this.completedChore);
  }
}
Add the debugger keyword at the beginning of the addCompletedChore method intending to test the behavior of our code. When the app loads, choose a complete chore and click the button. Let’s see what’s happening:

As you can see, the app works how we expected. The value is received in the App Component but we need to send it to the chores-list component. To accomplish that is necessary to use property binding.
6. Send the value to the chores-list.ts through @Input
We’ve already declared the input field in ChoresListComponent – @Input() chore = ”. It will receive the value from the App Component. Let’s send the data by dint of property binding.
<h1>I am the App Component</h1>
<h3>Select completed chore</h3>

<select #chores>
  <option *ngFor="let chore of choresList">{{chore}}</option>
</select>
<button type="button" (click)="addCompletedChore(chores.value)">Add to parent</button>


 <!--here, we assign to the chores-list's class property
     the value of the App Component's class property -->
<app-chores-list [chore]="completedChore"></app-chores-list>
7. “Catch” each change in the @Input field by using the ngOnChanges() method
Now the ChoresList Component has one particular value, but the user may select more than one option, so we have to collect all its choices in an array. In ChoreList’s class, we’ve already declared the completedChores array and we’ll save each choice in it.
We can detect each change(value) in the input field(chore) by using the OnChanges lifecycle hook. We’ve defined the ngOnChanges() method and Angular will call it when a change happens in the chore property. The method takes an argument of type SympleChanges which is a hashtable containing the property name as an index and a SympleChange object as a value. The structure in our case looks like this:
{ chore: SimpleChange }
And the SimpleChange object’s structure looks like this:
SimpleChange {
  currentValue: It's of type any; Contains the new value of the field
  firstChange: It's of type boolean; Indicates whether this is the first change
  previousValue: It's of type any; Containes the previous value of the field
}
Let’s check when Angular calls the method. Call console.log in the ngOnChanges method and pass to it simpleChanges: SimpleChanges. Use simpleChanges[‘chore’] to access the SimpleChange object and print it onto the console. You may add the debugger keyword if you want to debug the app in the browser – the below image shows the process.
import {
  Component,
  Input,
  OnChanges,
  SimpleChanges,
} from '@angular/core';

@Component({
  selector: 'app-chores-list',
  templateUrl: './chores-list.component.html',
  styleUrls: ['./chores-list.component.css'],
})
export class ChoresListComponent implements OnChanges {
  @Input() chore = '';
  completedChores: string[] = [];


  ngOnChanges(simpleChanges: SimpleChanges) {
     debugger;
    // when change in the field occurs, Angular calls this method
    // Access the change through SimpleChanges
    // The code below will print an object of type SymplaChange
    console.log(simpleChanges['chore']);
  }
}

You may wonder why Angular calls the ngOnchanges method immediately after the loading of the app. You may think that only when the user selects a chore and clicks the button Angular would call the method. This is not entirely correct because the input property chore receives the default value of completedChore from the App Component (which is an empty string completedChore = ”;) when the app has loaded. That’s why this is the first change in the input field and the current value is an empty string – firstChange: true, currentChange: “”. The next changes will be caused by the user.
8. Collect all @Input changes in an array
Now we can detect changes in the chore property and we want to print them in between the chore-list component. Hence, we have to collect them in the completedChores array.
When Angular calls the method, we know that the input has been changed, hence, we can access the new value in between ngOnChanges() and push it into completedChores. Keep in mind that we don’t need to keep the first change because is an empty string, therefore, we’ll skip it.
import {
  Component,
  Input,
  OnChanges,
  SimpleChanges,
} from '@angular/core';

@Component({
  selector: 'app-chores-list',
  templateUrl: './chores-list.component.html',
  styleUrls: ['./chores-list.component.css'],
})
export class ChoresListComponent implements OnChanges {
  @Input() chore = '';
  completedChores: string[] = [];


  ngOnChanges(simpleChanges: SimpleChanges) {

    //We don't need the first change
    if (simpleChanges['chore'].firstChange === false) {
      //it will push all the changes caused by the user
      this.completedChores.push(this.chore);
    }

   // debug the process
    console.log(this.completedChores);
  }
}
The code workers how we expected. See the output of the example in the below video:
9. Next step of the ngOnChanges example is to show the array on the browser screen
In order to print each element of the completedChores array on the screen, we’ll use *ngFor. Every time a new element is added, it will be shown in between the chores-list template.
<h2>Completed Chores List</h2>

<ul>
  <li *ngFor="let chore of completedChores">{{chore}}</li>
</ul>
The video shows how our application should work:
10. Send an array to the @Input property
As I mentioned earlier, if you send to the input property a reference value, the behavior of the ngOnChanges method is different. Let’s make some changes in the example in order to understand it.
In app.component.ts, we’ll change the sent property of type string completedChore into an array completedChores: string[]. So when the button is clicked, the information will be collected in completedChores and we’ll pass its value to the ChoresList Component. So we have to create a new @Input field of the same type(array) to receive the data. The app will work the same way, but the ngOnChanges will be called only once at the first change. Below is the altered code and the video that shows how many times Angular calls the method:
import { Component } from '@angular/core';

@Component({
  selector: 'app-root',
  templateUrl: './app.component.html',
  styleUrls: ['./app.component.css'],
})
export class AppComponent {
  choresList = [
    'Washing dishes',
    'Making the bed',
    'Vaccuming',
    'Dusting',
    'Cleaning the bathroom',
    'Laundry',
    'Watering plants',
    'Grocery Shopping',
    'Cleaning out the oven',
    'Cleaning the windows',
  ];

  //here we'll collect all choices of the user and we'll pass the data to the chores-list input property
  completedChores: string[] = [];

  addCompletedChore(value: string) {

    //here, we collect the choices of the user
    this.completedChores.push(value);
  }
}
<h1>I am the App Component</h1>
<h3>Select completed chore</h3>
<select #chores>
<option *ngFor="let chore of choresList">{{chore}}</option>
</select>
<!-- accessing the selected value -->
<button type="button" (click)="addCompletedChore(chores.value)">Add to parent</button>
<!-- we're passing the array to the @Input chores property of the chores-list component-->
<app-chores-list [chores]="completedChores"></app-chores-list>import {
Component,
Input,
OnChanges,
SimpleChanges,
} from '@angular/core';
@Component({
selector: 'app-chores-list',
templateUrl: './chores-list.component.html',
styleUrls: ['./chores-list.component.css'],
})
export class ChoresListComponent implements OnChanges {
//we created the @Input field to receive the array from the App Component
@Input() chores: string[] = [];
ngOnChanges(simpleChanges: SimpleChanges) {
//here, we're checking how many time ngOnChanges will be called
console.log('Angular calls ngOnChanges');
console.log('Completed Chores Counter:' + this.chores.length);
}
}<h2>Completed Chores List</h2>
<ul>
<!-- change the property name into chores -->
<li *ngFor="let chore of chores">{{chore}}</li>
</ul>Let’s look what look the behavior of the app:
11. Create a copy of the array and send it to the @Input field
Instead of using the push() method in app.component.ts, we’ll create a copy of the current array and reassign it to the property. In this way, Angular will detect the changes and call ngOnChanges because the address value of the array will be different. Alter addCompletedChore implementation:
//Code...
//.....

addCompletedChore(value: string) {
   // here we're assigning a new array to the field
    this.completedChores = this.completedChores.concat([value]);
  }

//Code...
//.....
This way we can see: Each time the user selects a value, Angular will call the ngOnChanges method.
Summary
Congrats, you’ve created the Chores List App and now you know how to detect changes in a @Input property. You are familiar with the ngOnChanges method, SimplyChanges, and SymplyChanges.