How to Pass Data from Child to Parent Component in Angular

In this tutorial, we will learn how to pass data from a child to a parent component. We will create a basic chore app. The child component will contain an input field and a button. When a user types a particular chore into the input field and clicks on the button, the data will be sent to the parent component through EventEmmiter. We will collect the information in an array in the parent’s class.
1. Create an App
Create an app using the Angular CLI command – ng new child-to-parent. We won’t need Router, so type ‘N’
When you run the command in the console, Angular will create the root App Component so we can use it as a parent component. Replace the generated HTML from the template with the following code:
<!-- app.component.html -->
<h1>I am the Parent Component</h1>
<h2> Chores List: </h2>
2. Create a Child Component
Let’s add a child component. Type ‘ng generate component child’ into the console and make sure you are in the app’s directory.
The command will produce four files related to our component. In the child.component.ts file, we can find the component selector that we will use in the parent template (when Angular locates it, it will render the corresponding component). Put an input field and a button in child.component.html.
<!--  child.component.html -->
<h2>I am the Child Component</h2>
<h3>Enter a chore</h3>
<label for="chore-input">Add a chore:</label>
<input type="text" id="chore-input">
<button type="button">Add to parent</button>
3. Load the Child Component
In order to load the child component on the browser screen, we have to put its selector in the parent component (App Component Template).
<!-- app.component.html -->
<h1>I am the Parent Component</h1>
<h2> Chores List: </h2>
<!-- This is the child's selector,
    It is defined in the child.component.ts file; -->
<!-- The child template will load here-->
<app-child></app-child>
It’s time to test what we have done. Run ng serve in the console to start the app and type http://localhost:4200/ into the address bar of your browser. If you see the same thing as the picture below, congrats!

4. Add a Field in the Parent’s Class
Add a field in the parent’s class that will receive the data if the click event in the child component occurs. The property will hold an array of objects, and each object will represent a particular chore.
//--> app.component.ts
//This is the parent's class
import { Component } from '@angular/core';
@Component({
  selector: 'app-root',
  templateUrl: './app.component.html',
  styleUrls: ['./app.component.css'],
})
export class AppComponent {
 // --> This is the field that will receive the data
  choresList = [];
}
5. Define a property with @Output() in the child’s class
The Output decorator informs Angular that a specific class property will emit an event from the component. Through that property, we can pass the data to the parent component. The field should be of type EventEmitter. Import Output and EventEmitter from @angular/core in order to use them. We will send to the parent component’s field an object that ‘describes’ a chore (for example: {name: ‘Dusting’}); therefore, EventEmitter should emit data of type ‘that object’. So let’s create an interface to define it.
//--> child.component.ts
import { Component, Output, EventEmitter } from '@angular/core';
//describing a chore
interface IChore {
  name: string;
}
@Component({
  selector: 'app-child',
  templateUrl: './child.component.html',
  styleUrls: ['./child.component.css'],
})
export class ChildComponent {
//we defined chore field with Output decorator
//designating that this will be a way
//through which the data will flow upward to the parent component
//It has to be of type EventEmitter
//Because the data flow will start only when an event occures
  @Output() newChoreEvent = new EventEmitter<IChore>();
}
6. Listen for an Event in the Child’s template
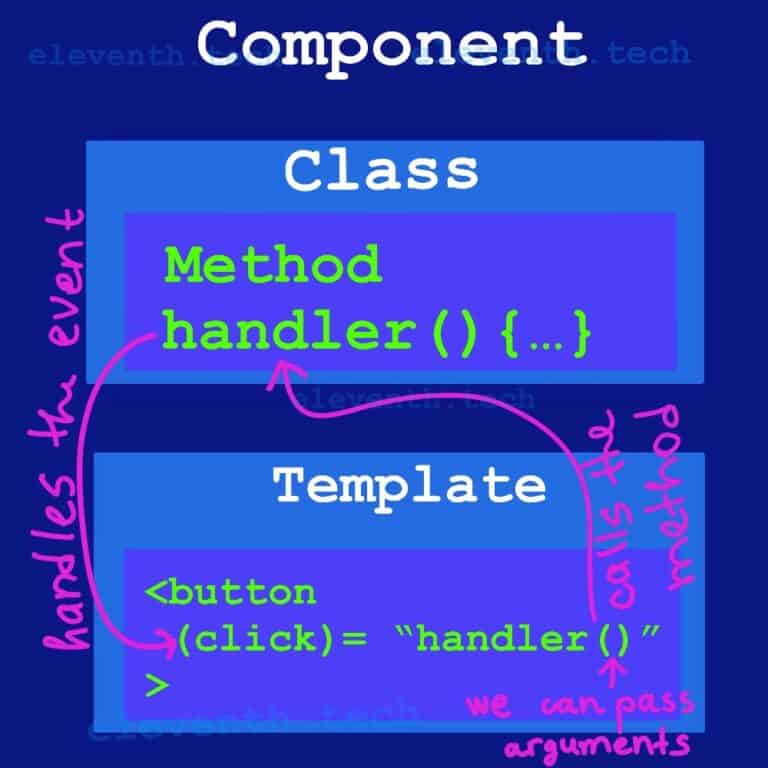
The parent component will receive a value from the child if the user clicks on the button after entering a specific chore. Hence, the component has to listen for the click event. When it occurs, the component should emit the event ( in our case, the value of the input ) and notify the parent that something has happened. To implement this, we have to use Event Binding – we need to put the event name in between parentheses and show Angular what method to call to handle the event <button type=”button” (click)=”addNewChore(newChore.value)”>Add to parent</button>.
The addNewChore method will be implemented in the child’s class, and we will handle the event in it. As you can see, the method receives an argument – the value of the input. #newChore holds a reference to the DOM input element, and we can access its property ‘value.’
<!-- child.component.html -->
<!--  this is the child's template -->
<h2>I am the Child Component</h2>
<h3>Enter a chore</h3>
<label for="chore-input">Add a chore:</label>
<!--
Here in the input element
with #newChore
we defined a template variable
It is a reference to the DOM input element;
hence, we can access the value of the input though the variable
-->
<input type="text" id="chore-input" #newChore>
<button type="button" (click)="addNewChore(newChore.value)">Add to parent</button>
7. Handle the Click Event in the Child’s Class and Emit Our Custom Event (EventEmmiter)
In child.component.ts, we have to implement addNewChore(). In it, we will call the emit() method of the EventEmitter class. The value of the input will be passed as a string to addNewChore(), so we need to transform it into an object. We will pass it to the emit method, so the data will be raised to the parent.
//--> child.component.ts
import { Component, Output, EventEmitter } from '@angular/core';
interface IChore {
  name: string;
}
@Component({
  selector: 'app-child',
  templateUrl: './child.component.html',
  styleUrls: ['./child.component.css'],
})
export class ChildComponent {
  @Output() newChoreEvent = new EventEmitter<IChore>();
//this method will hadle the click event from the template
  addNewChore(value: string) {
//we created a chore object that we will send to the parent
    const chore = { name: value };
//we call the emit method of the EventEmitter class,
//so this will create a way through which the chore object
//will be sent to the parent
    this.newChoreEvent.emit(chore);
  }
}
8. Create a Method in the Parent’s Class. It Will Receive the Data
We need to implement a method in our parent’s class that will receive the event value as an argument later in the parent’s template. We also need to save that value to the current array of chores. Take a look at the following code:
//--> app.component.ts
import { Component } from '@angular/core';
//an interface for the chore object
interface IChore {
  name: string;
}
@Component({
  selector: 'app-root',
  templateUrl: './app.component.html',
  styleUrls: ['./app.component.css'],
})
export class AppComponent {
  //All items will be collected here
  choresList: IChore[] = [];
  //this method will receive the value of
  //the event through the parent's template
  addChore(newChore: IChore) {
    //add new chore to the list
    this.choresList.push(newChore);
  }
}
9. Receive the Data From the Parent’s Template
In order to get the data from the child, you need to use again Event Binding syntax and put it in the child’s selector name: (newChoreEvent)=”addChore($event)”. So newChoreEvent is the event we created earlier in child.component.ts. We ‘registered’ it as an Event by using @Output and EventEmitter. We already created a method in the parent’s class that will handle newChoreEvent – addChore($event). AddChore will receive the event value (what we emitted earlier from the child ) and our choreList will hold the necessary information.
<!-- app.component.html -->
<h1>I am the Parent Component</h1>
<h2> Chores List</h2>
<app-child (newChoreEvent)="addChore($event)"></app-child>
10. Render the Received Value
We have to use the structural directive *ngFor in the parent’s template to render the list on the screen. It will loop all through the choresList property and create an <li> element for each list item.
<h1>I am the Parent Component</h1>
<h2> Chores List</h2>
<ul>
  <li *ngFor="let chore of choresList">
  {{chore.name}} </li>
</ul>
<app-child (newChoreEvent)="addChore($event)"></app-child>
Enter these values in sequence: Dusting, Washing dishes, Cleaning out the oven. Your screen should look like the below image.

Summary
Passing data from the child to the parent component happens by using the @Output decorator for the child’s field. The field must be of type EventEmitter. When an event occurs in the child’s component, it will raise it to the parent component with emit(). Pass the value you want to be sent to emit() as an argument. Then you need to handle the newly created event in the parent’s template.